Footprint Order Flow in Practice: 3 Types of Key Price Levels to Help You Filter Out Blind Entries
Order Flow is like a magnifying glass through which traders observe the market.
It helps us see the actual buying and selling behavior behind candlesticks, but what is truly valuable is not observing a single order flow signal in isolation, but knowing where to focus observation.
In actual trading, key Support & Resistance (S&R) areas are often exactly the places where order flow deserves the most attention.
In this EagleTrader strategy sharing, we will start from the Footprint chart, sort out several types of key order flow price levels worth focusing on, and further break down a trading approach that combines support and resistance with order flow signals.
Magnetic price levels: where are reversals more likely to occur?
Most traders are familiar with traditional support and resistance, such as historical highs and lows.
But Footprint charts can also help us discover some 'hidden price levels' that ordinary candlesticks cannot easily reveal directly.
These levels often exert a strong pull on price and may also become important future support and resistance.
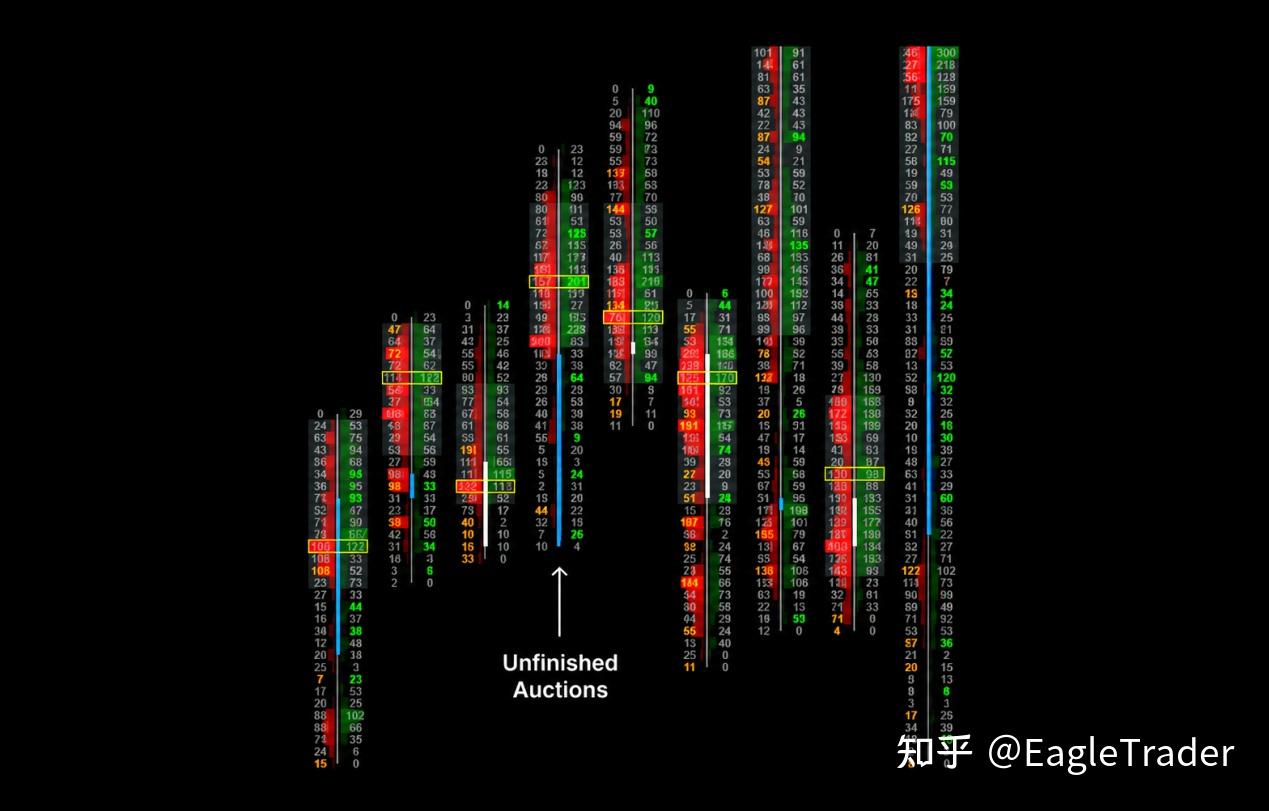
1. Unfinished Auction
Suppose the market is rising rapidly. In the Footprint, if at the high of the highest candlestick there is still trading on both the Bid and Ask sides, for example: Bid 10 × Ask 4
Normally, at the extreme of a candlestick, volume on one side should be close to 0.
If there is still trading on both sides at the highest or lowest point, the so-called Unfinished Auction is formed.
This means the auction process at that price level has not fully ended, so price will often later return to this level for a test. Such levels can usually serve as:
potential take-profit targets;
important future support or resistance areas.
2. LVN and untested VPOC
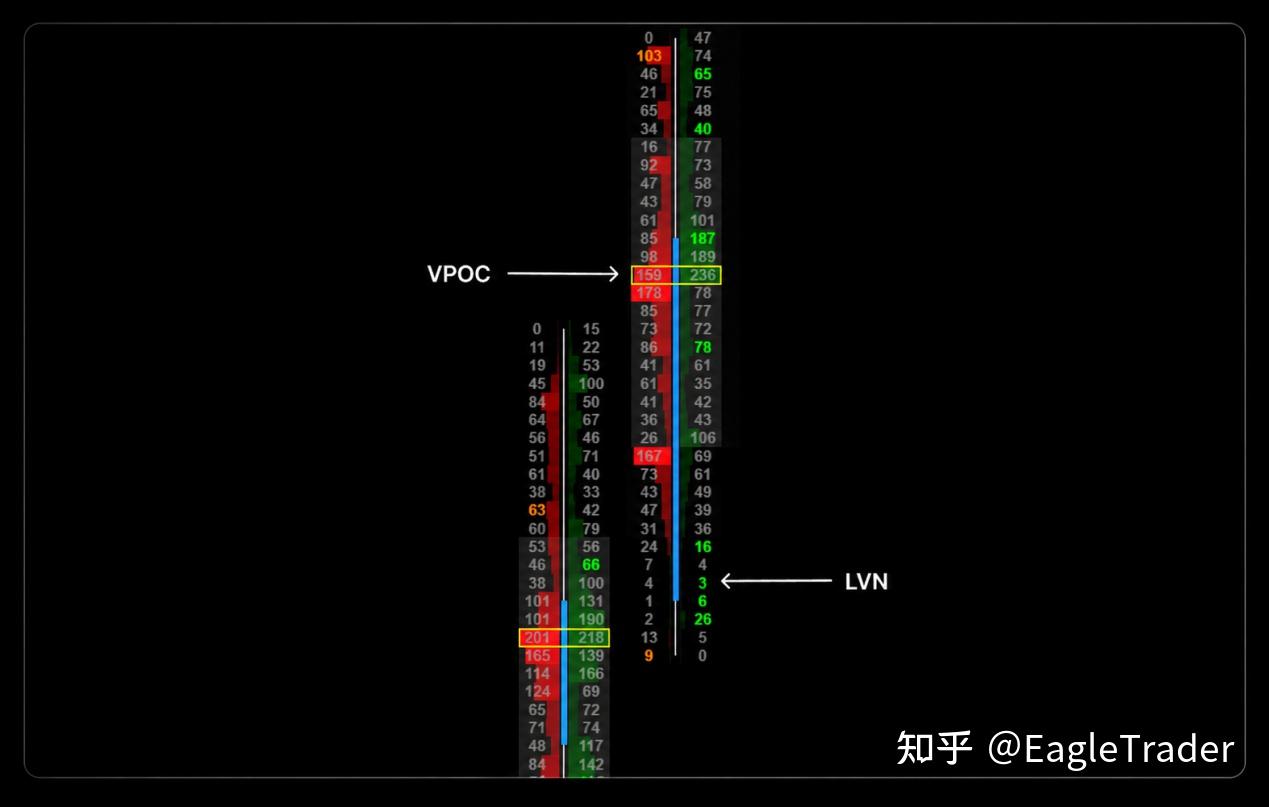
LVN (Low Volume Node) LVN is a price area with significantly low volume, which on the Footprint usually looks like a volume 'void' or a position close to 0.
This means price once passed through this area quickly without sufficient trading forming.
When price later returns to an untested LVN, two situations usually occur: either it passes through quickly, or it very precisely bounces or pulls back.
Therefore, untested LVNs are often price areas worth focusing on.
VPOC (Volume Point of Control) VPOC is the specific price level with the largest volume in a certain candlestick or trading session.
If a VPOC has not been retested after formation, it often becomes an important attraction area for future price and may also form strong support or resistance.
A common rule of thumb is: the more concentrated multiple untested VPOCs are in a similar area, the more important that area usually is.
3. Zero Prints / Single Prints inside the Footprint
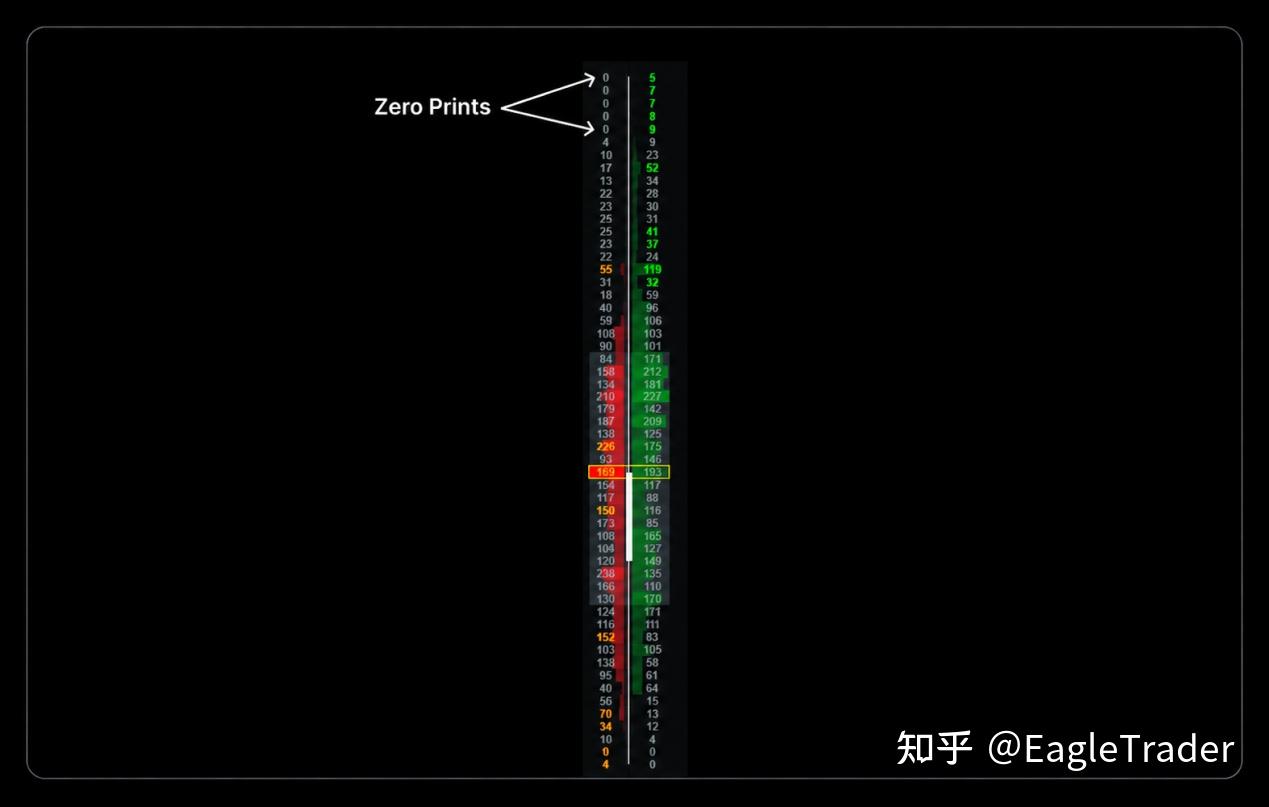
Sometimes, you will see a zero inside a candlestick rather than at the highest or lowest point. This usually happens in very aggressive and fast market conditions.
For example, a large amount of aggressive buying quickly sweeps upward through liquidity, and price rises so fast that the Bid side has no time to form effective trades, leaving a zero inside the Footprint.
This structure is usually called: Zero Print or Single Print. It can be understood as a 'trading gap' left during a rapid price movement.
Because price once passed through this area quickly, the market often later returns to test and fill this level, and then continues the original trend. Therefore, such areas are very suitable for observing trend-continuation entry opportunities.
Combining market context with order flow: trading
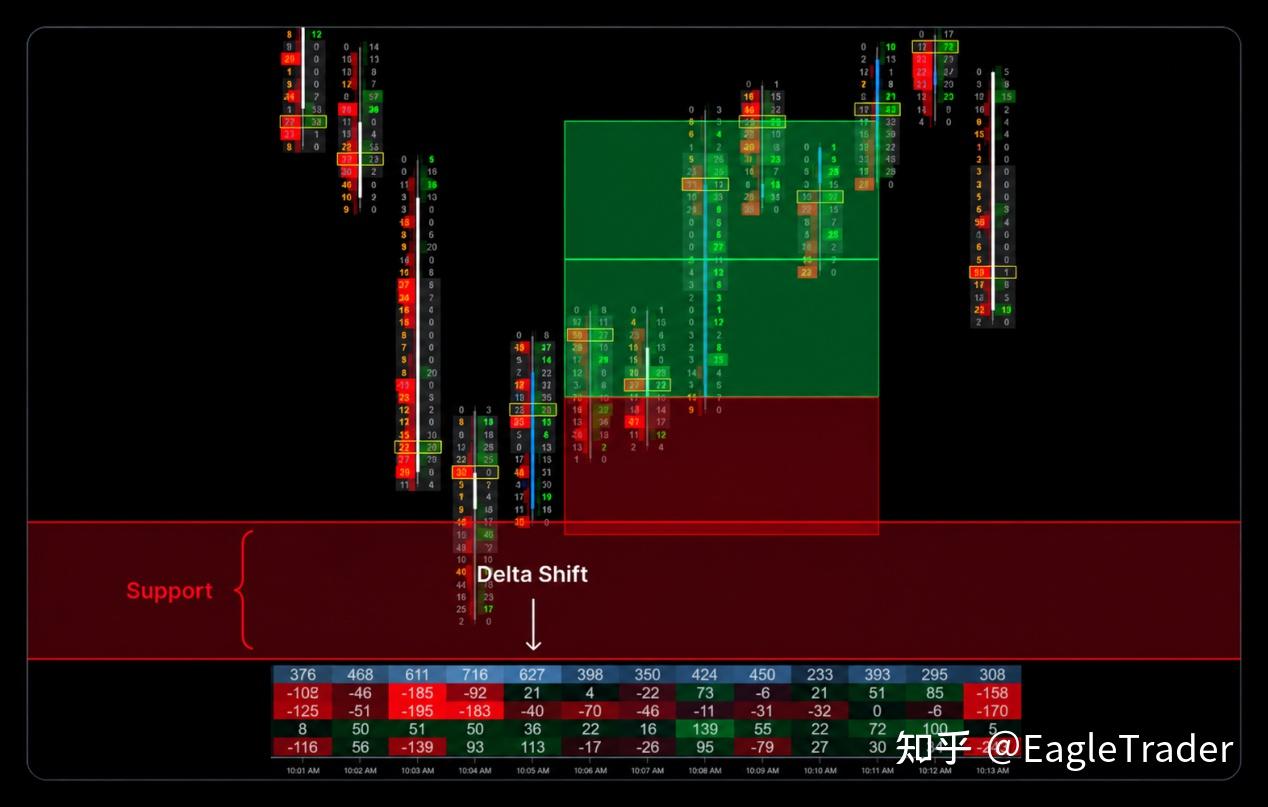
After understanding the key price levels, the next step is to combine these levels with order flow signals. Below, we take long trading (LONG) as an example; short logic can be understood in reverse.
1. Basic context
Price first needs to reach a clear and valid support and resistance area. For example: daily support; an untested LVN from the previous trading day; or other important support areas.
2. Delta shifts
Focus on whether Delta shows a clear change, ideally: from negative to positive. This shows that the aggressive selling that previously pushed price down is weakening, while aggressive buying is gradually gaining the upper hand.
3. Candlestick structure
We want to see a bearish candlestick enter the support area, followed immediately by a bullish reversal candlestick. That is: price first falls into the key area, then quickly shows a reaction in the opposite direction.
4. VPOC position
For an ideal long structure, the reversal candlestick should preferably: close above its own VPOC. This point is very important, because it means buyers not only entered the market but also successfully pushed price above the area where the candlestick's volume was most concentrated.
5. Entry
When the reversal candlestick closes and meets the above conditions, the trade can be considered. A relatively ideal entry position is: above the reversal candlestick's VPOC.
6. Stop Loss
The stop loss can be set: below a key support area; or, if the support area is wide, below the low of the reversal candlestick.
7. Take Profit
Take profit can be approached in two ways.
Method A: Fixed risk-reward
ratio, such as 2:1 or 3:1.
Method B: Dynamic targets
Set targets based on key 'magnet levels' in the direction of the trade, such as: unfinished auction; untested VPOC; Zero Print.
These levels can all serve as potential take-profit references.
5 important principles for order flow traders
1. Respect higher timeframes
If you trade on a 1-minute chart, you should at least also observe order flow and market structure on the 15-minute or 30-minute timeframe at the same time.
This helps you better understand the broader environment in which the current signal occurs.
2. Be wary of ranging markets
When the market continues to move sideways and lacks a clear trend, the reliability of some order flow signals, such as large Bid or Absorption, often declines.
3. Distinguish between aggressive executions and price reaction
The market is always seeking liquidity and balance. If a very large aggressive order appears but fails to push price in the expected direction, that order has likely already been absorbed by the counterparty.
At this point, price may instead move in the opposite direction.
4. Market location matters more than a single signal
Even if a very beautiful order flow structure appears on Footprint, if it occurs at a location with no support/resistance significance, its reference value remains limited. Location is always very important.
5. Do not look for so-called 'sure-win signals'
Footprint can show internal market executions more clearly, but trading is still a matter of probability. Any Setup can fail.
Therefore, when large funds in the market sweep local liquidity, setting a reasonable stop loss remains the most important part of trading risk control.
Order flow cannot completely prevent traders from losing. But it can help us understand more clearly what is happening inside the market and reduce blind entries lacking a basis.
For EagleTrader traders, the true value of Footprint lies not in finding a '100% effective' signal, but in using the mutual confirmation among order flow, price location, and market structure to give every trading judgment a clearer basis.
This article is only for EagleTrader trading strategy sharing and market analysis and does not constitute any investment advice.
Financial markets involve risk; please trade cautiously according to your own circumstances.
Ready to take on EagleTrader Max?
No upfront evaluation stage. Trade immediately once funded, with up to 90% profit split.